Achieving the perfect pant length can elevate your entire outfit. While many assume hemming pants is a complex task reserved for tailors, it’s surprisingly achievable at home with the right tools and guidance. This article will walk you through the process of what does it mean to hem pants, providing a comprehensive step-by-step guide to help you achieve professional-looking results.
This guide will cover everything from understanding why hemming is important to selecting the appropriate hem length, gathering the necessary tools, and mastering the stitching technique. By following these steps, you’ll be able to confidently tailor your pants for a perfect fit and enhance their overall appearance.
Hemming Pants: Why It Matters
Hemming pants goes beyond simply adjusting the length; it plays a crucial role in both aesthetics and functionality. A well-hemmed pair of trousers instantly elevates your look, creating a polished and put-together impression. A properly hemmed pant leg prevents fraying, extending the lifespan of your garment and ensuring it maintains its shape and integrity over time.
Furthermore, hemming allows you to customize the fit of your pants, achieving the desired length that complements your body type and personal style. Whether you prefer a classic straight hem or a more contemporary cropped look, hemming provides the flexibility to tailor your trousers to your exact preferences.
Tools and Materials Needed
Before embarking on your hemming journey, gather the essential tools and materials:
- Sewing Machine: A sewing machine is highly recommended for achieving a durable and professional-looking hem. If you don’t have one, you can hand-stitch the hem, but it will require more time and patience.
- Scissors: Sharp fabric scissors are crucial for making clean and precise cuts. Avoid using regular household scissors as they can damage the fabric.
- Measuring Tape: A measuring tape is essential for accurately determining the desired hem length and marking your pants accordingly.
- Pins: Pins will help hold the fabric in place while you sew, ensuring a straight and even hemline.
- Thread: Choose thread that matches the color of your pants for a seamless finish.
- Iron and Ironing Board: Pressing is crucial for achieving a professional-looking hem. An iron and ironing board will help remove wrinkles and create crisp lines.
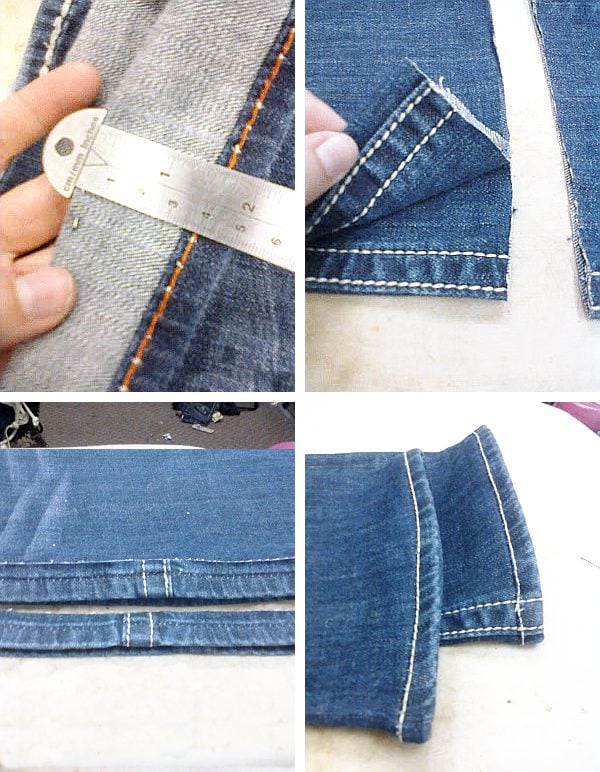
Step-by-Step Guide to Hemming Pants
Follow these steps to hem your pants like a pro:
Prepare Your Pants: Start by putting on the pants and marking the desired hem length with pins or chalk. Ensure the pants are smooth and wrinkle-free for accurate measurements.
Measure and Cut: Once you’ve marked the desired length, remove the pants and measure the distance from the existing hem to your marked line. Add a seam allowance of about 1 inch (2.5 cm) to this measurement. This seam allowance will be folded under twice to create a durable hem.
Fold and Press: Fold the pant leg up along your marked line, then fold the raw edge inward by 1/2 inch (1.25 cm). Press the folds with an iron to create crisp lines. Repeat this process for both pant legs.
Pin in Place: Pin the folded hem in place, ensuring the pins are evenly spaced and perpendicular to the edge of the fabric. This will help keep the hem aligned while you sew.
Sew the Hem: Using a sewing machine, stitch along the top edge of the folded hem. Choose a straight stitch and a seam allowance of about 1/4 inch (0.6 cm). Backstitch at the beginning and end of your stitching to secure the thread.
Choosing the Right Hem Length
The ideal hem length depends on personal preference, body type, and the occasion.
Classic Straight Hem: This timeless style falls just above or below the ankle bone, creating a balanced and versatile look.
Cropped Hem: A cropped hem sits higher on the leg, typically ending around mid-calf or slightly above. It’s a trendy choice that adds a modern touch to your outfit.
- Ankle Length: This hem falls right at the ankle bone, elongating the legs and creating a sleek silhouette.
Pressing for a Professional Finish
Pressing is essential for achieving a polished and professional-looking hem. After sewing the hem, press it again with a warm iron to set the stitches and create crisp lines. Pay attention to the creases and folds, ensuring they are smooth and even.
Conclusion
Hemming pants may seem daunting at first, but with the right tools, guidance, and a little patience, you can achieve professional-looking results at home. By following this step-by-step guide, you’ll be able to customize your pant length, enhance their appearance, and extend their lifespan. Remember to choose the right hem length for your style and body type, and always press your work for a flawless finish.